| Note: The best results are achieved when using isopropyl alcohol for the 'fuel' - this is highly flammable and the vapour even explosive under some conditions. Please take due precautions when operating the cloud chamber with flammable fuels. Well ventilated room, no open flames etc. | Fuel: You will need the 'fuel': Isopropyl alcohol is very effective producing good clear results, but the cloud chamber will work with almost any low boiling point solvent. Heed the warning on the left when using flammable solvents. This chamber has produced results using water as the fuel.
|
|
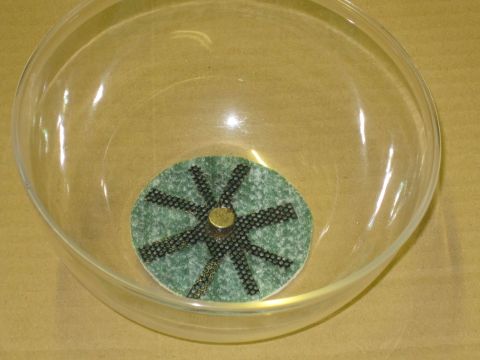
| Note: DO NOT pick up the Am241 'puck' with your fingers or look too closely at the active part (don't bring it up to your eye - do you want to get cataracts!) Although it is mostly an alpha emitter (short range but very damaging) it does also emit gamma radiation. Why expose yourself to radiation if you can avoid it - use tweesers etc: ref: www.world-nuclear.org/ | Radioactive test source. For testing I use an Americium 241 (Am241) 'puck'. This can readily be removed from an old smoke detector, many online videos demonstrate. I have embedded mine in a piece of foam so it's easier to handle. A piece of granite works and there are many radioactive minerals available online (Ebay etc) that will work well in a cloud chamber. Got an old luminescent watch/clock dial - that paint is lively! |
|
| Note: Ensure the power supply, power for the fans, lamp and especially the ion pump power leads (All electrical parts) are well clear of any chance of getting wet - electricity and water are not good friends! | Preparation. Setup your system on a strong bench/table - the water tank will be very heavy when filled(1Kg per litre) with sufficient room on the bench/worktop/table for the power supply and sundry items (keep them well clear of the water tank). |
|
 |
First fill the tank to
about 1cm or so below the rim. The exact depth will depend upon your
assembly but you want the base of the heatsink (the base of the
fins) to be level with or just out of the water. I often pre cool
the water with ice to 4...5C, the coldplate temperature gets lower
(well below -40C) and the ice blocks help keep the water cool for
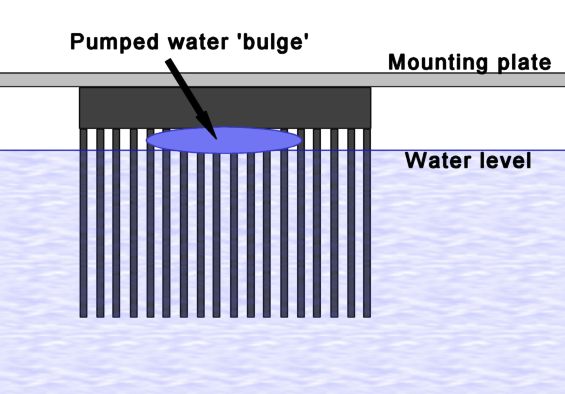
longer. I have run this with saltwater brine (250g salt per litre of water, slushy but just about liquid at -15C) cooled heatsink to below -10C, but it's messy - have to rinse everything in fresh water or get salt crystallising everywhere. Coldplate went below -58C! Place the cloud chamber assembly onto the watertank, best if the heatsink is clear of the edge so that water can exit from between the fins easily. Setup the pump (extension tube if necessary) so that the water flows up into the fins directly onto the base metal plate between them. It should 'cling' to the fins and then exit above the waterline if the base is above the waterline. See sketch Level the cloud chamber, use a spirit level if possible. The coldplate needs to be level to reduce convection currents within the chamber and keep the coolest air over the coldplate. Careful not to spill the water! |
|
 |
If your using a temperature probe Set the probe tip onto the coldplate - not onto the nylon screw heads. A thin film of fuel will help with the probe thermal contact with the coldplate. The temperature difference between the corners of the plate and the centre is negligible. If your using an unmodified probe then you will need a 5mm(or so) hole cut through the polystyrene base and black card top - to pass the probe through. Pass several cm of the wire into the chamber so it's cooled and does not conduct heat to the (relatively huge) probe and affect the temperature reading. Seal the 5mm hole with foam strip/tube. |
|
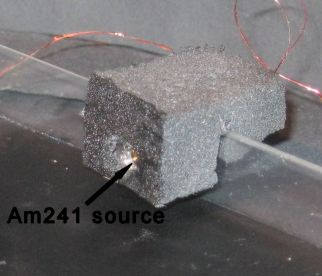 |
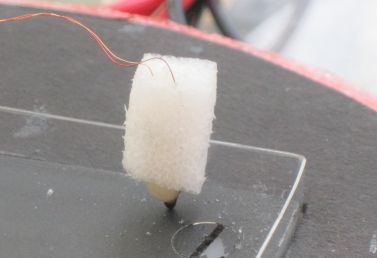
Test source. Put a small cut in the side of the foam block the source is embedded in. Fit the cut onto the fence to hold the foam block just off the surface of the coldplate. If it touches the fuel will soak the surface of the foam by capillary action - a thin layer of fuel will prevent most alphas from passing through, so a dry source is desirable. Position the source as close to the coldplate as possible without the foam touching. The sensitive zone above the coldplate is only a few mm thick. |
|
 |
Fit the felt pad to the
top of the dome, fix in place with the magnets, use a metal 'star'
to pin the edges if necessary. The exact amount is guesswork but add 2...3 small teaspoons of fuel to the felt. Place the dome on a flat surface to keep the fumes in whilst you prepare the plate. |
|
  |
Thoroughly clean the
coldplate of dust and debris. Use the LED lamp to highlight the
smallest of contamination - see
here. Use a camera lens brush, or microfibre cloth. Paper
towels, and normal cloths often leave more debris than they clear.
Do not rub the painted surface, do not get the plate damp, do not
blow on it - condensation. Any moisture on the plate, or in the air
inside the dome, will form ice crystals on the coldplate - visible
in some of my images and
videos. Drip, evenly over the coldplate, about half a teaspoon of the fuel (don't do this bit if your using water as fuel, you'll just get a insect sized skating rink). The exact amount is guesswork, you'll see when you have the right amount, it will spread over the coldplate in about a minute or so - top to bottom pic' about 1 minute. This layer of fuel stops droplets of condensate forming on the coldplate and creates an even, 'mirrored' surface at low viewing angles. This 'mirror' film of fuel helps the viewing by enhancing the contrast. |
|
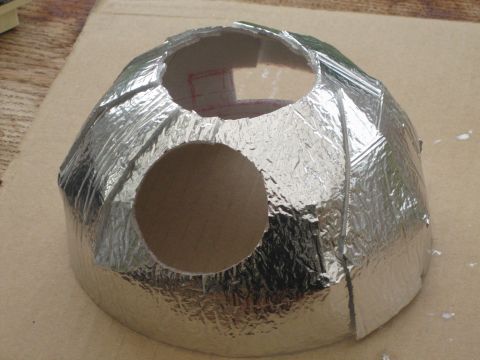
| Lower the dome and
carefully push down evenly over the polystyrene base. It should go about
10mm down before getting tight. An airtight seal is not necessary, just firmly centre and position the dome. |
|
|
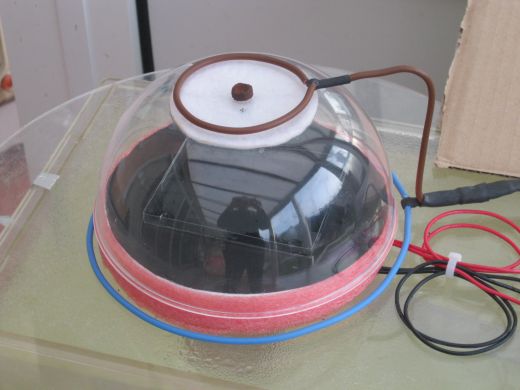
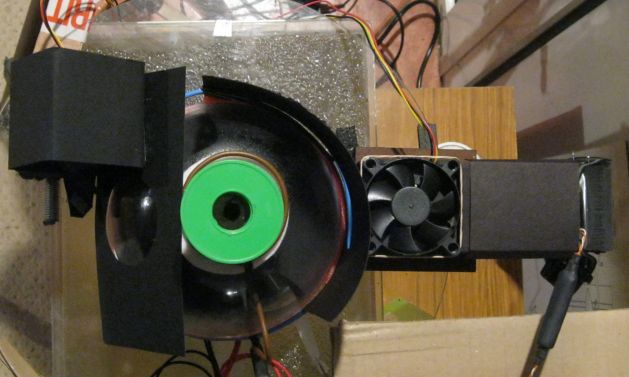
| If you have built it fit the ion scrubber now. It slips over the dome so that the large loop sits around the polystyrene base. The top loop just touches the top of the dome. The polarity of this ion scrubber is not important. I have + volts at the bottom, -volts at the top (wire colours reversed). |
 |
|
| Place your torch, light or
lamp assembly directly opposite your viewing position. If you have built an anti-condensation fan position it to clear your viewing 'port'. See pic. Switch on the water pump and ensure water is flowing.Plug in the lamp power, fans, ion scrubber and peltiers. Turn on the power supply. No BANG, good - The coldplate will rapidly cool. |
 |
|
| Note: Ensure the power supply, power for the fans, lamp and especially the ion pump power leads (All the electrical parts) are well clear of any chance of getting wet - electricity and water are not good friends! | As the coldplate cools you
will quickly see a mist develop over it. This mist indicates good
operation. In a few minutes the coldplate temperature should drop
below -26C - the 'transition temp' for isopropyl alcohol. At this
temperature and below the radiation from the test source (and background
radiation) will start to show distinct trails. If your plate does not get down to below -26C and your water tank is cooler than +20C, and your not in a 'tropical heat wave' with high humidity then you have problems with something. Remove the fans (if fitted) and illumination and just run the cloud chamber. If it still does not get cold: Why won't it work? |
|
|
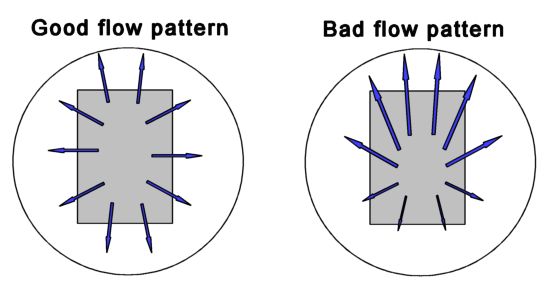
As the mist forms it will appear to be
moving across the coldplate. Move the lighting around so you can
observe the mist from different directions. The mist should appear
to be moving in different directions when viewed from different
positions around the dome. If the mist is consistently flowing in one direction adjust the levelling a mm or two at a time. If even extreme adjustment (1cm or so) does not even out the 'flow' check that the dome is on straight, the felt pad centred and there are no gaps around the polystyrene base foam strip to dome mating surface. The cloud chamber works with a 'flow', but its more effective if you can get the flow to be even, not in one general direction. See sketch. |
 |
|
|
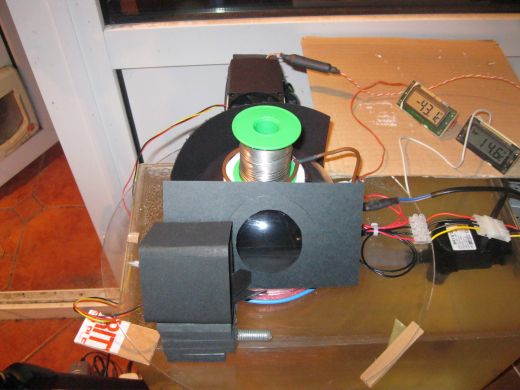
The cloud chamber running. Experiments with card light 'baffles' etc
to try and improve lighting and contrast. Solder reel acts as the heat source to keep the fuel from overcooling, doesn't take long below -40C. Here coldplate is at -43.1C, water (heatsink) at +14.6C. Temp difference 57.7C, calculated max' temp' difference is 60C, so fairly close - guesswork on the cooling load is probably the error. See explanations
|
 |
|
|
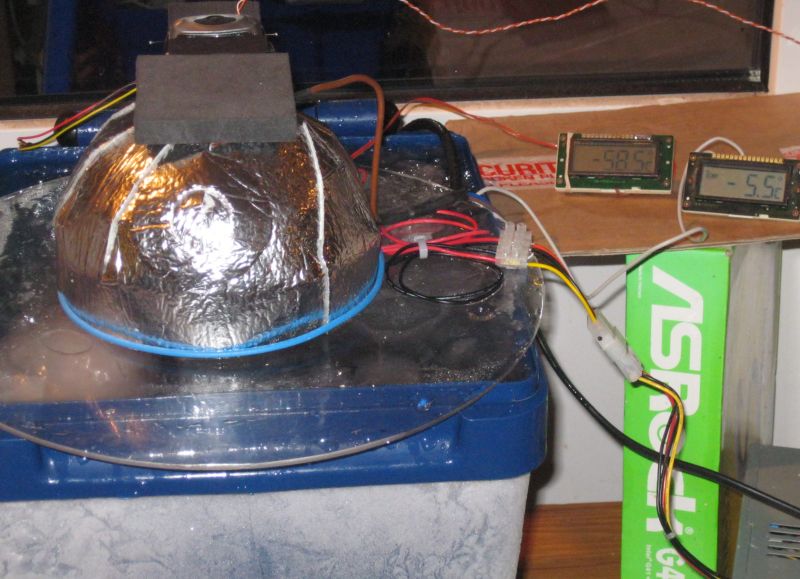
I made a 'tea cosy' from aluminised insulation for humid days.
Using this and salt water brine I have achieved my lowest coldplate temperature: -58.5C (assuming the probe is reasonably accurate near its limit). Poly' bucket for the brine all frosted over - the aquarium may have shattered at the initial brine temperature of -10...-15C. 'Hot' temperature probe is fixed to heatsink. No fans, and the viewing 'port' closed/covered most of the time. Inside of the 'cosy' was all frosted after the run. |
Getting the coldplate below -35C or so seems to produce better results - the system appears more sensitive see background video | |
 |
||
| If you watch long enough
you may see some interesting events. See
Pics and Videos The level of background radiation is what amazed me. The sensitive zone of the cloud chamber is only 60 * 80 * 5mm to see so much activity in such a small volume! Time to experiment - different sources, different fuels, how low can you go? My record coldplate low is -58.5C as of 20/12/2013. If you have a strong alpha source - try placing thin aluminium foil in their path and image both sides - see an alpha hit the foil and 'explode' out the other side with all sorts of debris - rare but spectacular, no images/videos of this yet. |